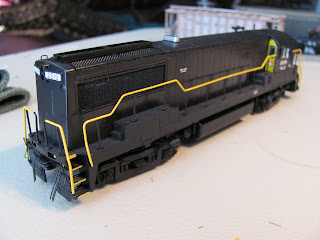
Well the loco has been painted and decaled. So far so good.
Step(1): I painted the whole locomotive using "Testors" gloss black thinned down to be sprayed in an airbrush (right out of the bottle is too thick), a gloss surface is the best for applying decals.
Step(2): Was to hand paint the window frames, many of the P&LE units had aluminum sashes around the windows this unit was no exception. First using a bambu skewer with the point sharpened I painted the outside of each window frame with "Testors" silver paint. I know, how do you paint with a stick? Well you really don't, what your doing is dipping the end of the skewer in the paint and drawing it on. (Just think of a true fountain pin.), next I used a fine paint brush to paint the insides of each window casing. Once the paint has dried, I then placed the windows in.
Step(3): Keep in mind that the cab is not connected to the locomotive yet. Next I began placing the decals on he cab, I used the following decal sheets for this project; Accu-cal multipak 5813H and Microscale P&LE Hood diesels #87-1227. The Accu-cal decals were used for the numbers on the cab and number boards. The Microscale decals were used for the yellow doors, the P&LE on the nose and the rest of the detail decals on the rest of the unit. The yellow door decals are the challenge, when you put them on the model only worry about lining up the hinge side of the door. Also the decal is a little longer than needed don't worry about it. (When you look at the decal at this point it doesn't look right, don't worry.) Once the decals have dried for approx. 24 hrs I used "Walthers" Solvaset - Decal setting solution. This takes out the silvering behind the decals and allows the decals to wrap around details on the surface of the model (i.e. rivets, door knobs, seams, etc.). When you put this on the door decal it will shrink enough to fit into the door molding (or at least in most cases). You will have to come back and touch up a little around the top of the door, the decal has squared ends where as the door is rounded.
Step (4): Once the decaling was completed, I spray painted "Testors" gloss coat over the whole mold to insure the decals were protected. Once the model was dry I began putting it together. The only painting that was left was the top rail on the rails, which I hand painted using "Floquil" CSX yellow. It's a pretty close match to the door decals. Once everything has set for approx. 24 hours I will begin applying the weathering.


Looks great. Very nice work. I am modeling the P&LE in N scale and your photos will be great reference material.
ReplyDelete